 by
by
This article will cover how to do a basic setup for .Net projects using MSBuild, MSTest and Git in a Jenkins Continuous Integration server. It doesn't cover the Jenkins installation, so I'll assume you've got a working installation ready. Otherwise, you can read this post about how to install Jenkins on a Windows Server.
If you follow this tutorial, you'll see how to create automatic tests and builds, triggered after committing code to a Git repository.
Windows Setup
Before turning your attention to Jenkins, you need to set up some prerequisites on your server. Some tools and settings are required for a great DevOps environment.
Reminder: When you configure system settings such as Windows’ PATH variable or creating tool installations, make sure that the user account under which your Jenkins installation is running has access to them.
- Install Git on the server
Jenkins will rely on an external Git installation, so just download the latest release at the official site and install it on the server. If you’re using a self-signed certificate, make sure to follow the steps to add the certificate to Gits trusted certificates as described in another post. - Agents for Microsoft Visual Studio 2015 (If you don’t have Visual Studio installed)
Go to the official download site and download the Agents for Microsoft Visual Studio 2015. That’s a package intended for running MSTest without having Visual Studio installed. It’s got that typical Visual Studio installer with that it's extra-long install duration, so better download and start the install right now before you reach the point in this tutorial where it’s required 😉 - Microsoft Build Tools
Go to the download section at VisualStudio.com and navigate to the downloads section. Under Tools for Visual Studio 2015, you’ll find a download for Microsoft Build Tools that you need to grab. The picture below shows the correct download.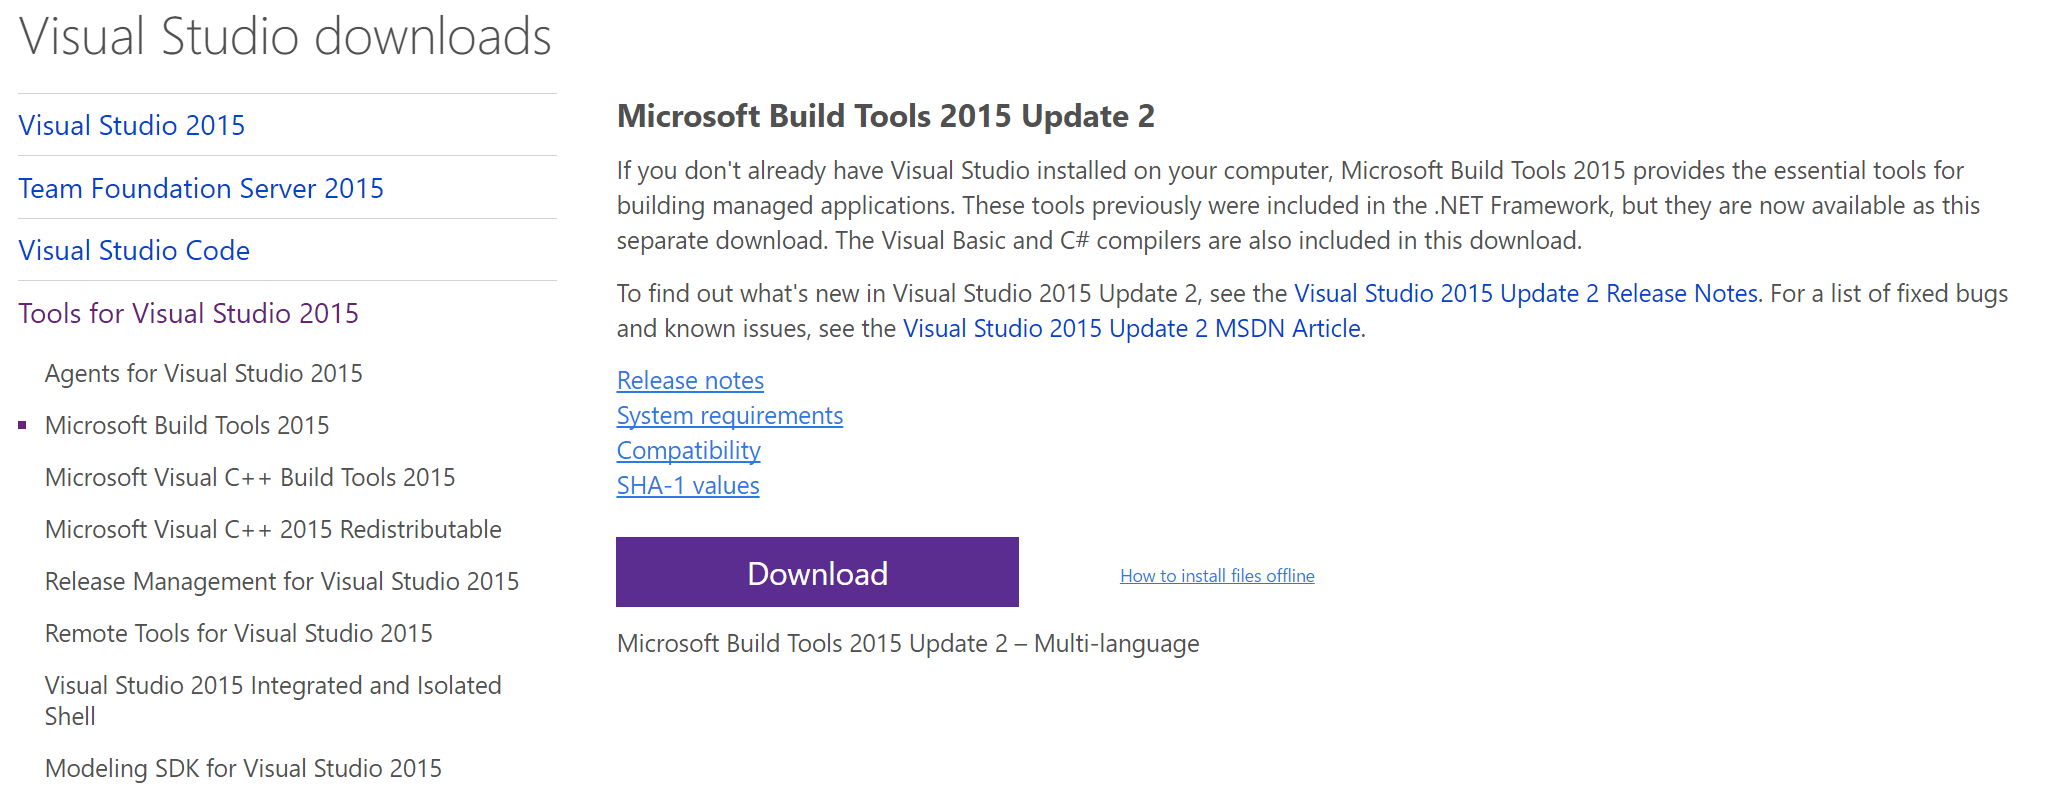
Update 2017-11-06: I'd actually recommend now to go for Visual Studio 2017. You can get it at the official download site and if you select the workloads you need, you'll get all the required SDKs without having to worry about each single one.
Tip: If you’re having a lot of different target frameworks, you might actually be better off to go along with Visual Studio Community Edition instead of the separate Build Tools & Agents. It’s more heavy on the install side, but it comes with all different .Net SDKs and features installed that you’ll need (except the Dotnet CLI environment, but that’s in another post).
- NuGet
You'll be fine by getting the latest executable from the NuGet documentation and place it in a directory that's accessible to your Jenkins service.
Git Windows Style Line Ending Setting
You’re probably familiar with the issue of different operating systems using different defaults for representing line endings, such as \r\n in Windows or just \n in Linux. Since Git is not a native Windows tool, it defaults to the behavior of normalizing line endings to \n when checking out code.
However, imagine a case where you’re performing some integration testing of a library that creates text and uses C#’s Environment.NewLine as line endings. In Windows, this will result in a \r\n newline. Now when you compare text created in your tool in an integration test, you might run into issues where Expected Line #1\nExpected Line #2 is different to Expected Line #1\nExpected Line #2. You can handle this in your tests by ignoring line endings, but you can also easily reconfigure Git to use standard Windows line endings. I prefer the latter since I’m in a pure Windows environment and don’t need to deal with cross-OS normalization.
Logged in as the user under which Jenkins runs, issue the following command in Git to ensure that on checking out, Windows line endings are used:
Git config --global core.autocrlf true
Required Plugins
To make Jenkins work with Git and the .Net stack, we need to add a few plugins in the Manage Jenkins -> Manage Plugins section:
- Git Plugin
Provides support for Git repositories - MSBuild Plugin
We need that to build our .Net projects - VSTest Runner plugin
This will use vstest.console.exe to run unit tests. That’s the unit test execution engine Visual Studio uses. You’ll want this since I’ve encountered issues with MSTest, for example the ExpectedException attribute does not work with the MSTest that’s currently included in the Agents for Visual Studio and there might be more issues. It might work for you, but if you’re relying on MSTest then better take the VSTest Runner - MSTest plugin
To convert MSTest results to the JUnit Xml format
Install these plugins and restart Jenkins.
Plugin Configuration
Git Server Credentials
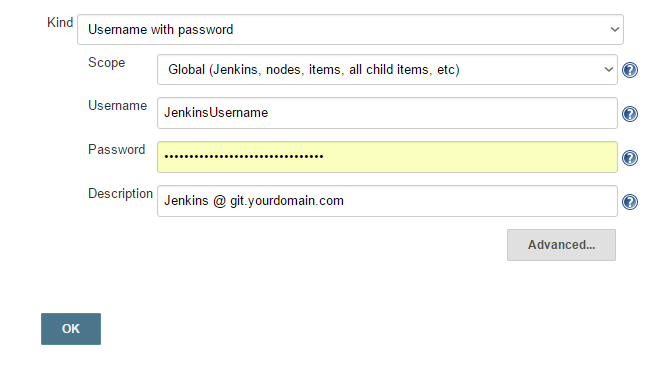
You have to create a login on your Git server so that Jenkins can access the repositories. When you have created a user with access rights to the repository, go back to Jenkins, navigate to Manage Jenkins -> Manage Credentials -> Add Credentials and then select Username with password in the combobox.
Enter the credentials you have created on the Git server here so that we can use whenever Jenkins needs to access the Git server.
If you haven’t done it yet, create a new Git repository containing a simple C# (or VB.Net or...) class library and a MSTest unit test project.
MSBuild Configuration
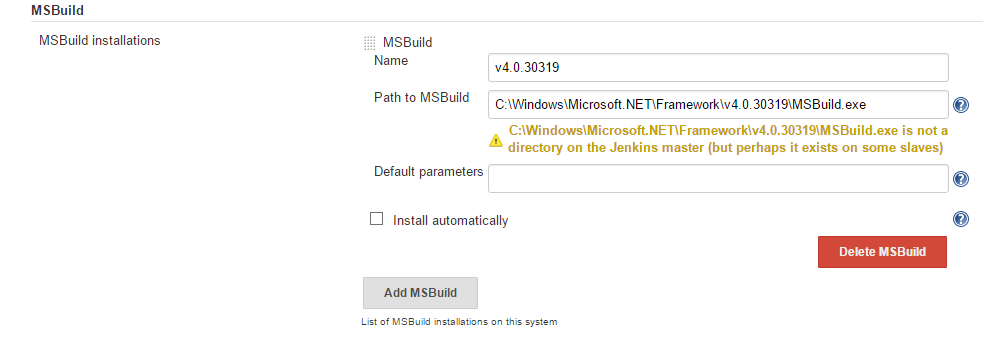
MSBuild should already be present on your system. If it is not, you can manually download the .Net framework or use the server manager to add the ASP.Net features to your IIS installation and have the framework automatically come along. The folder shown is the standard location of MSBuild (for the currently latest .Net version). This configuration section is again found in Manage Jenkins -> Global Tool Configuration.
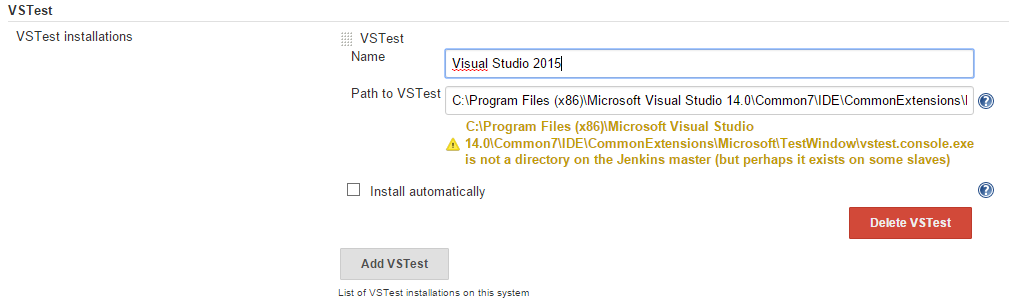
VSTest Configuration
This is similar to setting up MSBuild. You’ll need to point the path to the Visual Studio directory that contains the vstest.console.exe (it’s also installed with the Agents for Microsoft Visual Studio 2015). I named it by the Visual Studio version.
Create your first job
In Jenkins, go to the main menu and click New Item in the upper left corner. Give the job a name and select Freestyle Project, then click OK.

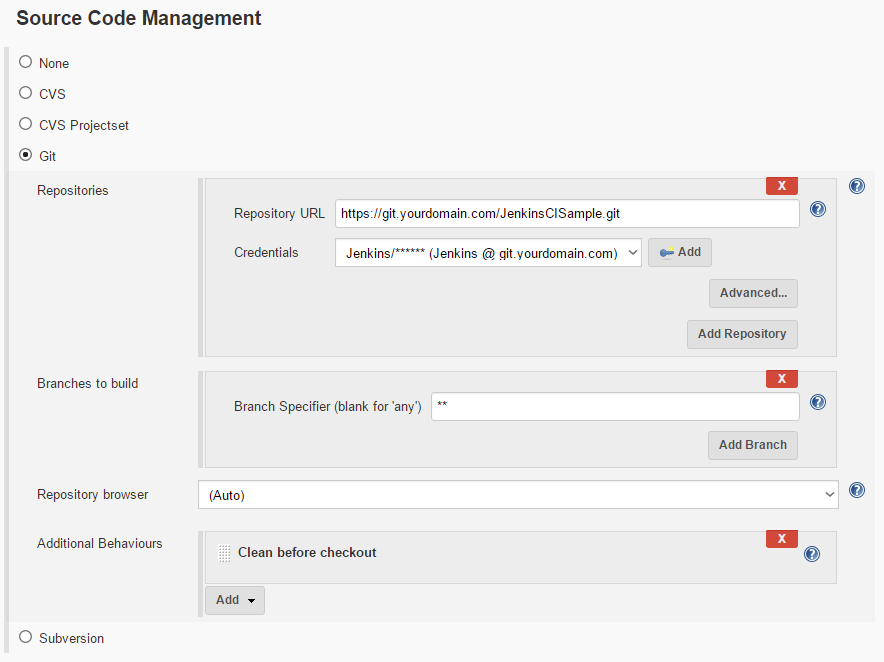
Now you are in the job configuration page. Here, go to the Source Code Management section and tell Jenkins to use Git and specify the Url of the repository. Select the login credentials that you’ve configured earlier for the Git server. Also click on Add Additional Behaviours and select Clean before checkout, otherwise the results from previous builds will not be cleaned up and you get more and more test results with every build=)
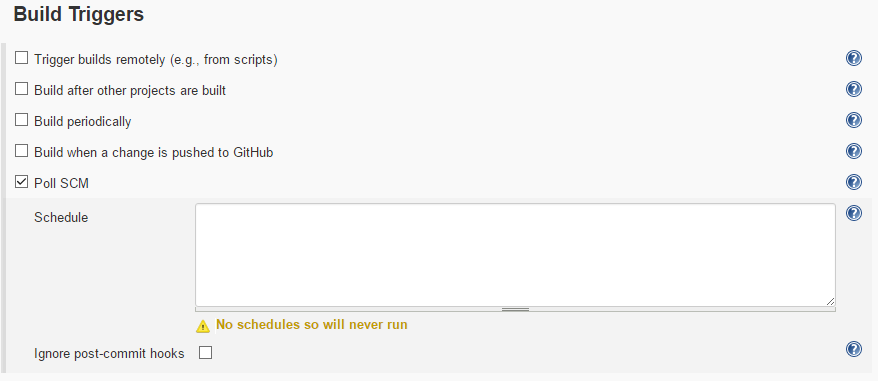
In Build Triggers, just select Poll SCM without entering a schedule. It’ll warn you that it will never run, but that’s wrong, it will run whenever you push to the Git server. It’s important to leave Ignore post-commit hooks unchecked!
Now we configure two build steps. The first will make the build using MSBuild. It’s pretty straightforward, we’re just referencing the *.sln file via its relative path in the repository (It’s in the root folder for this sample project).

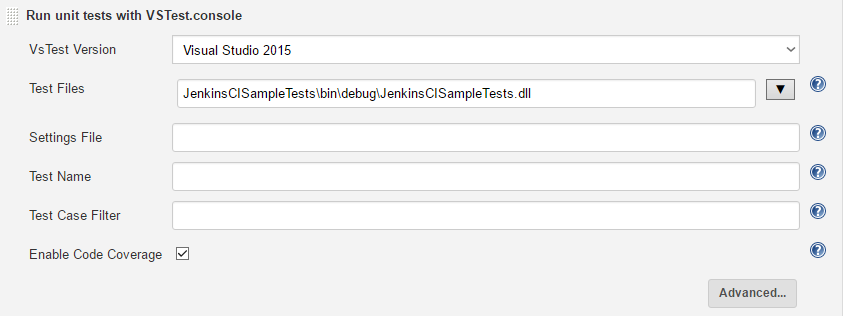
Another build step is configured to execute VSTest. The steps are done consecutively, so it’ll wait until the build step is done to execute the tests. Two parameters are specified: The dll containing the unit tests and the name of the file in which to store the unit test results. Note that you could enter multiple unit test dlls here if necessary. You can leave the advanced settings as they are.
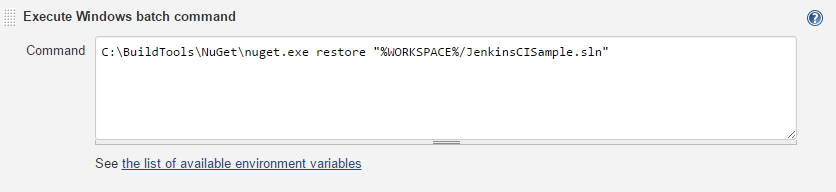
Tip: If you’re having any NuGet packages referenced in your project, you’ll most likely do not have them in source control (which is good!). Then you need to restore them before you can build the project. Hence, add the following build step as FIRST step to your build actions (and set the paths according to your local config):
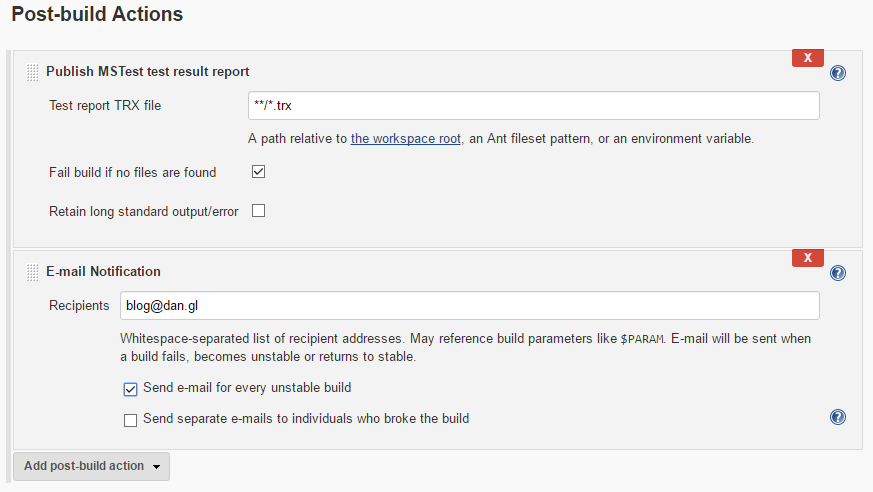
After the build we tell Jenkins to do two things: Read that *.trx MSTest results file from the VSTest Runner and convert it to a JUnit output (this allows Jenkins to display the unit test results) and additionally we’ll set up an email notification for when things go wrong.
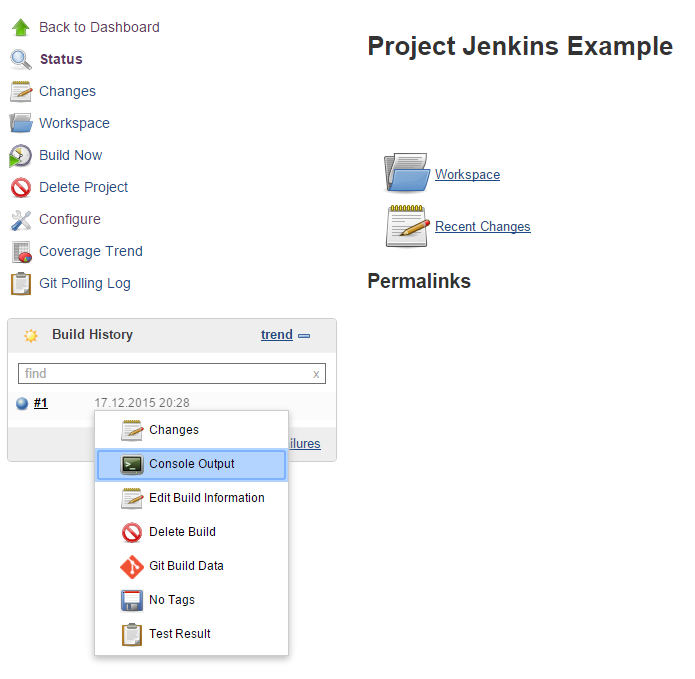
Now click Save and you’re in the detail view of your created Job. Click on Build Now on the left to start your first build! In a few moments, the Build History will show you the job. You can hover over the date entry and expand the sub menu. Now select Console Output to see what’s going on.
If everything went right, the last line in the console output should say:
Finished: SUCCESS
Tip: If the test failed, the console output should provide you with information on what went wrong.
Testing the Git hook
If you've already setup a remote Git repository and configured a Git hook to notify Jenkins on updates (here's a post describing how to do that with a self hosted Bonobo Git Server), now would be the time to trigger an automatic build.
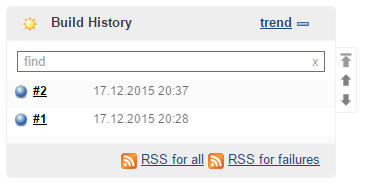
When you look at Jenkins after having done a commit on your remote Git repository, Build History should now have a second entry.
Break the Build
This rarely ever happens in real life, but legend has it that builds break. Let’s add some faulty code and make the compiler unable to build the project. Then commit. Refresh the page...
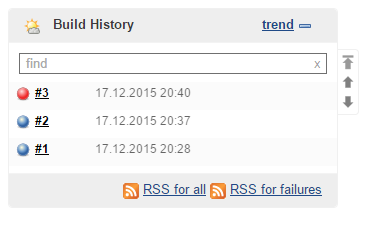
… and face disaster!
Luckily, you've also been alerted by email of the failing build. You can go to the build and view the console output (that’s also what’s been sent to you by email). It’ll show you a log that will list some compiler errors near the bottom.
Let’s fix that and make another commit. You’ll get another email telling you that the build is back to normal.
To summarize, whenever there is a change that makes a build fail, you’ll be notified by email. As soon as the build starts working again, you’ll get another email. Quite simple yet so convenient!