 by
by
Update: There's a follow up post that's using the new Visual Studio 2017 project format.
Get the Required Tools on the CI Server
Just like with unit testing in a CI environment, you’ll need the .Net Core SDK to be available to Jenkins. It’s available at the official download site. Additionally, on the hosting server, you need the .Net Core Windows Server hosting bundle, available on the same site. See the official documentation for how to install it. You will also need to install Node.js and npm on the server that is hosting Jenkins so you can run all the prepublish commands for an Asp.Net Core application.
To install Node.js, go to its download site and grab the latest Windows installer. When installing, make sure that Add to PATH is enabled in the install options (it is by default), so that the npm command is added to the PATH environment variable and therefore directly recognized in the command line interface.
Make sure to restart Jenkins after you've added the tools, as the PATH variable is only read at startup and not watched for changes!
Tip: It's not required to globally install node modules like bower or gulp on the build server. That should be handled by node.js’ devDependencies and proper pre- and postpublish scripts in your deployment process.
Configure Jenkins to Build the Project
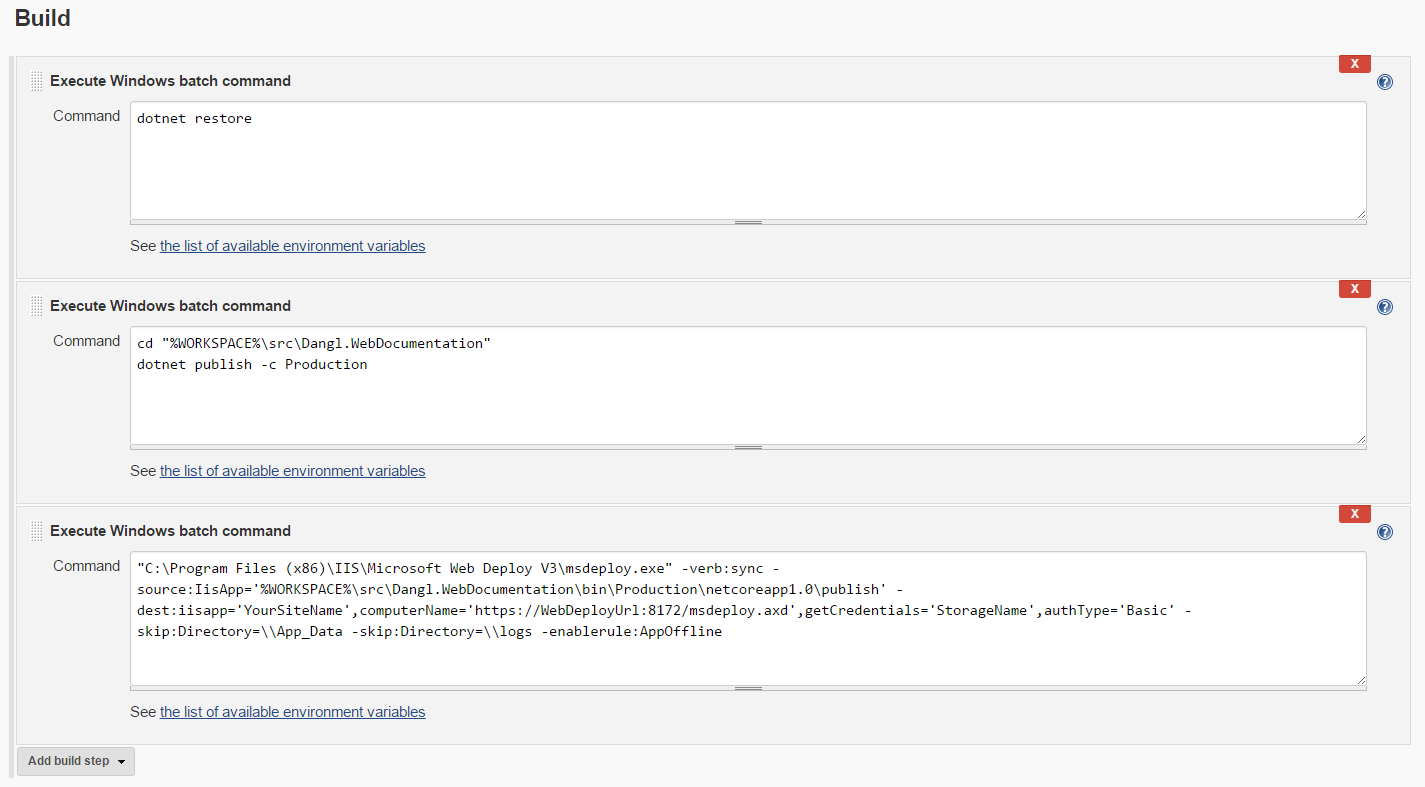
In Jenkins, just create a new project and configure the source code management, for example by pulling from a Git repository. To build, publish and deploy, the following Windows batch command steps are necessary:
- dotnet restore
Restores NuGet packages for all projects below the workspace folder.
Note that right now, private (password protected) NuGet feeds are not working with the dotnet cli, see this issue on GitHub. You can resolve that by storing the password in plain text in NuGet.config. - cd "%WORKSPACE%\<PathToProject>"
dotnet publish -c EnvironmentName
Changes directory to the actual project folder and runs the publish command. Replace the EnvironmentName with whatever you want to use for publishing.
To make sure your pre- and postpublish scripts run, include them in your package.json (for npm) and project.json (for dotnet) files, for example like this:
project.json:
"scripts": {
    "prepublish": [ "npm install", "npm run prepublish" ],
    "postpublish": [ "dotnet publish-iis --publish-folder %publish:OutputPath% --framework %publish:FullTargetFramework%" ]
  }
package.json:
"scripts": {
      "prepublish": "bower install && tsc && gulp clean && gulp copyClientDeps && gulp min"
    }
This combination would effectively run the npm install and npm run prepublish commands first, then compile and publish the application via dotnet cli and finally run the dotnet-publish-iis command.
Additionally, before deploying, you might want to run a web.config transformation as described here.
Publish to IIS with Web Deploy
For the following step, you should have set up Web Deploy on both the source and target server. There’s only one more step needed, and that is calling msdeploy.exe to publish the app to IIS.
When doing that, you must supply valid credentials for the user that has publishing rights in IIS. Since it’s never a good idea to include plain text user credentials in a script or build step, you have to save them manually to the Windows credentials store. For that, log into your CI server with the user account for Jenkins, open a command prompt and execute the following command:
"C:\Program Files (x86)\IIS\Microsoft Web Deploy V3\msdeploy.exe" -verb:dump -source:Iisapp=YourSiteName,computerName='https://WebDeployUrl:8172/msdeploy.axd?site=YourSiteName ',userName='Username',password='Password',authType='Basic',storeCredentials='StorageName'
- YourSiteName
The name for the site. This is rather important since the WebDeploy service will determine whether or not the user has access to the service depending on the site name that is specified here. - WebDeployUrl
You should just specify the Url endpoint for the WebDeploy service (that was configured earlier). If you’re not having an SSL certificate for that (or none at all, because you’re free to use any dns name for the MSDeploy service on Port 8172), you can add the parameter “-allowUntrusted”, which ignores SSL errors. But you should really try not to ignore SSL errors in any setting, especially in a CI environment where it’s never ever gonna be resolved again… - Username
The username for the user who you gave access to WebDeploy. You might possibly have to include the network domain name in the form of “domain\user” or, if it’s a local user, the servers computer name as “serverComputerName\user”. - Password
Should be clear – Provide the user accounts password - StorageName
This is the key under which the credentials will be stored in Windows' Credentials Manager, you’ll later retrieve them by going like “use credentials for StorageName”
The authType=’Basic’ parameter is not strictly required. If your happen to be in an Active Directory domain, you could also use Windows Authentication and completely omit any credentials in the Web Deploy process.
The verb=dump will result in msdeploy listing you the contents of the remote location (upon successful authorization), so you know you've got it right when you see that. (or see no error messages, since we haven’t yet deployed any files=)
As per the msdeploy documentation, the credentials will be stored even if the response is a 401 – Unauthorized, so keep that in mind if you're just testing stuff. Also, the path to the msdeploy.exe may vary on your installation if you chose not to install it in the default location.
Now that we've stored the credentials we can finally approach the last line of commands we’re going to need for the Jenkins job:
"C:\Program Files (x86)\IIS\Microsoft Web Deploy V3\msdeploy.exe" -verb:sync -source:IisApp='%WORKSPACE%\publish -dest:iisapp='YourSiteName',computerName='https://WebDeployUrl:8172/msdeploy.axd?site=YourSiteName',getCredentials='StorageName',authType='Basic' -enableRule:DoNotDeleteRule - -enablerule:AppOffline
- verb:sync
We want to sync our publish folder with the server, so this is the operation (“verb”) to perform - source:IisApp='%WORKSPACE%\publish
The publish directory, will be by default like bin\EnvironmentName\Platform\publish below the project folder - dest
The destination where we want to deploy to. YourSiteName and the WebDeployUrl should be adjusted to your needs, as well as the StorageName under which you stored the credentials. It’s the same command you used to store the credentials earlier. - enableRule:DoNotDeleteRule
This is playing on the safe side, the setting prevents files from being deleted on the server if they’re not present in the source. It’s not required for most applications and might cause troubles when your website folder contains old files. So say, for example, you only want to keep your AppData folder where you store local files for your site, then just swap this command with
-skip:Directory=\\App_Data
You can chain multiple rules, so you can always exclude additional folders from the deployment. - enablerule:AppOffline
This will copy an app_offline.html file before the operation and remove it afterwards, telling IIS to shut the site down during the deployment process. It’s so you don’t get any conflicts where DLLs are still loaded and can’t be overwritten.
If you want to dig further into msdeploy, these three links from the technet contain a lot of info:
Summary
Here’s a screenshot of all three required build steps:
Now you should be able to click on “Build now” and let the magic happen, continuous deployment for your .Net Core website. Have fun!