 by
by
Move the Jenkins Directory to Another Folder
When Jenkins is installed in Windows, it defaults to C:\Program Files (x86)\Jenkins as installation directory, which is fine for the program itself but not for your working data (the folder in which all your jobs data is stored). So before you go and start configuring some Jobs, better move the home folder somewhere else, e.g. C:\JenkinsHome.
First, create the new folder where you want to put the data to. In a second step, you have to move the content of the original Jenkins installation to the new directory. You should move any files except the following (and you can also keep the log files in their default directory).

When that's done, before you can restart the Jenkins service, open jenkins.xml and point the entry for JENKINS_HOME to your new directory, like this:
<!-- Original line below -->
    <!-- <env name="JENKINS_HOME" value="%BASE%"/>-->
<env name="JENKINS_HOME" value="C:\JenkinsHome"/>
Tip: It's even easier to just move the whole installation directory itself and then modify the Windows Service to point to the new directory. Matt McHugh has nicely described on StackOverflow how to change the path of a Windows Service executable in the Windows Registry.
Configuring a dedicated Windows User Account for Jenkins
If you haven't done that already then you should set up the Jenkins Windows Service to run as a dedicated user instead of using the Local System service account. To do that, just add a local user on your build server without any special permissions, just make sure you add the user to the group Remote Desktop Users so that you can use this account to log in via Remote Desktop to set up some requirements (like NPM or add entries for the local credentials store). Then, go to Services, find the Jenkins Service and configure it to use the account you just created. The permission for this account to be used as Windows Service should automatically be granted to this account.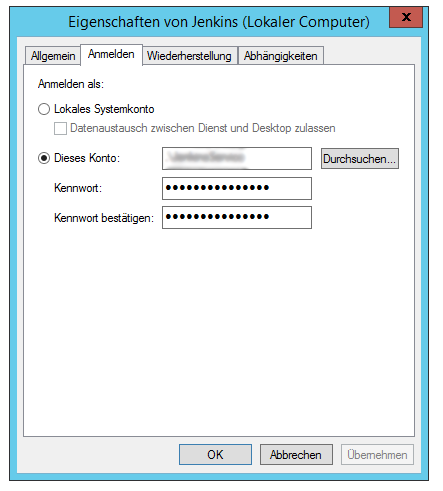
In the next step, go to your Jenkins install directory and grant full access to the JenkinsService user in that directory. Do the same for the new JenkinsHome directory (if there are two separate directories) where you moved Jenkins to. Now, restart the service in Windows and Jenkins should be running under that new (much less privileged!) account.
Additionally, if you're already using OpenCover on some jobs, make sure to replace the argument -register with -register:user so you don't get any exceptions due to lacking user rights.