The source code for this project is available at GitHub and here's a live example of the website.
This fourth part of the series is focusing on using a Jenkins Continuous Integration server to run tests for .Net Core on the back end and Angular 2 on the front end. Right now, it's on .Net Core 1.0.0 1.0.1 (You should upgrade!) 1.1.0 1.1.2 2.0 and Angular 2 RC3 RC4 RC5 RC6 Final 4.1.3 5.2.3, but I will write about migrations when there are updates. You can read about what I had to change for each migration in the commits on GitHub.
To start, you need to have a configured Jenkins installation with the xUnit and NUnit plugins and a project set up that checks out the source code for the NetCoreHeroes sample. Obviously, npm and the latest .Net Core SDK should be installed as well. You can also check out how to install Jenkins on Windows and prepare it for .Net Continuous Integration. I've also written another post with a bit more details of how to continuously test .Net Core apps.
Tip: Testing any .Net Core app works this way!
Prepare the Project for Unit Testing
If you've read the last article in this series, you should be able to locally run the tests for the project in Visual Studio. The xUnit test runner is already configured as dependency and therefore, the dotnet test command will be available whenever the project is restored. Chutzpah, however, is a Visual Studio extension and therefore not present on your CI server. Luckily, there's a Chutzpah NuGet package available that you should include in your main csproj so the chutzpah.console.exe tool is being downloaded upon project dependency restoration.
<PackageReference Include="Chutzpah" Version="4.3.4">
      <PrivateAssets>All</PrivateAssets>
</PackageReference>
Tip: Chutzpah 4.3.0 or newer is required for the Server Mode. That's where Chutzpah itself hosts a webserver to serve the test scripts
NuGet packages are stored by default in your local user profile folder in the .nuget folder, and since it's a build dependency nothing is being copied to output.
Configure the Jenkins Job
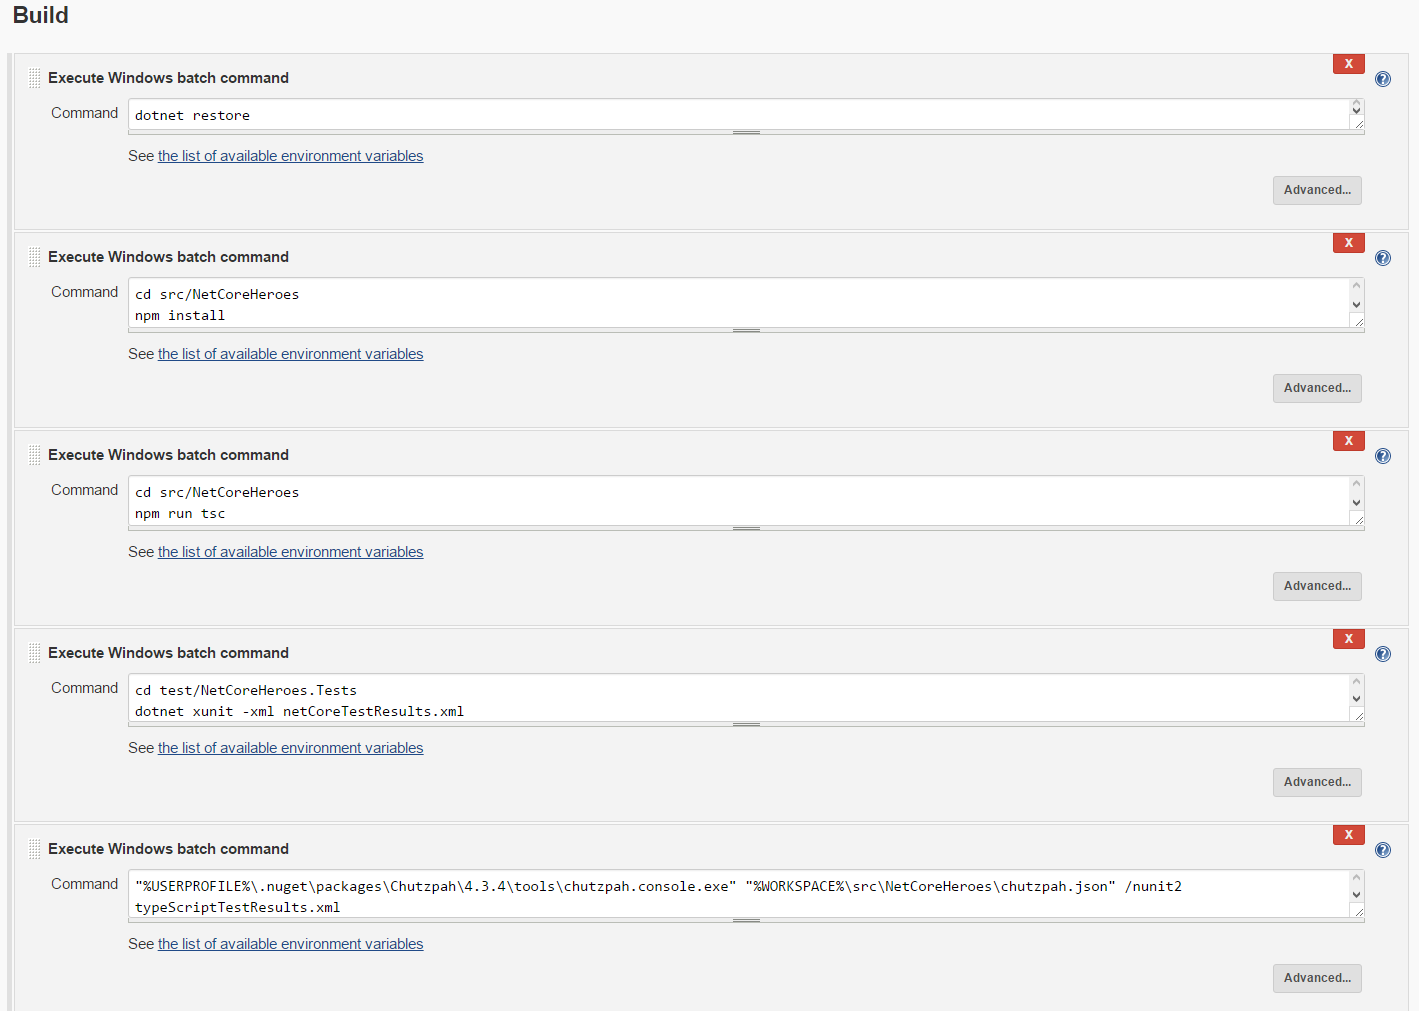
You'll only need five commands to completely build the project and run the tests in Jenkins:
 C
C
- dotnet restore is obvious, executed in the root folder (where your global.json is located) restores packages for all projects in the solution
- cd src/NetCoreHeroes and npm install restores npm packages for the main project
- cd src/NetCoreHeroes and npm run tsc compiles your TypeScript files
- dotnet xunit "%WORKSPACE%/test/NetCoreHeroes.Tests" -xml netCoreTestResults.xml executes the xUnit tests for .Net Core and writes the results to an output file
- "%USERPROFILE%\.nuget\packages\Chutzpah\4.2.3\tools\chutzpah.console.exe" "%WORKSPACE%/src/NetCoreHeroes/wwwroot/chutzpah.json" /nunit2 typeScriptTestResults.xml executes the Angular 2 unit tests with Chutzpah (which is being saved to your local user profile since it's a dependency in project.json). I've decided to use the nunit2 xml format since its better structured in the Jenkins reporter than junit.
Publish the Test Results
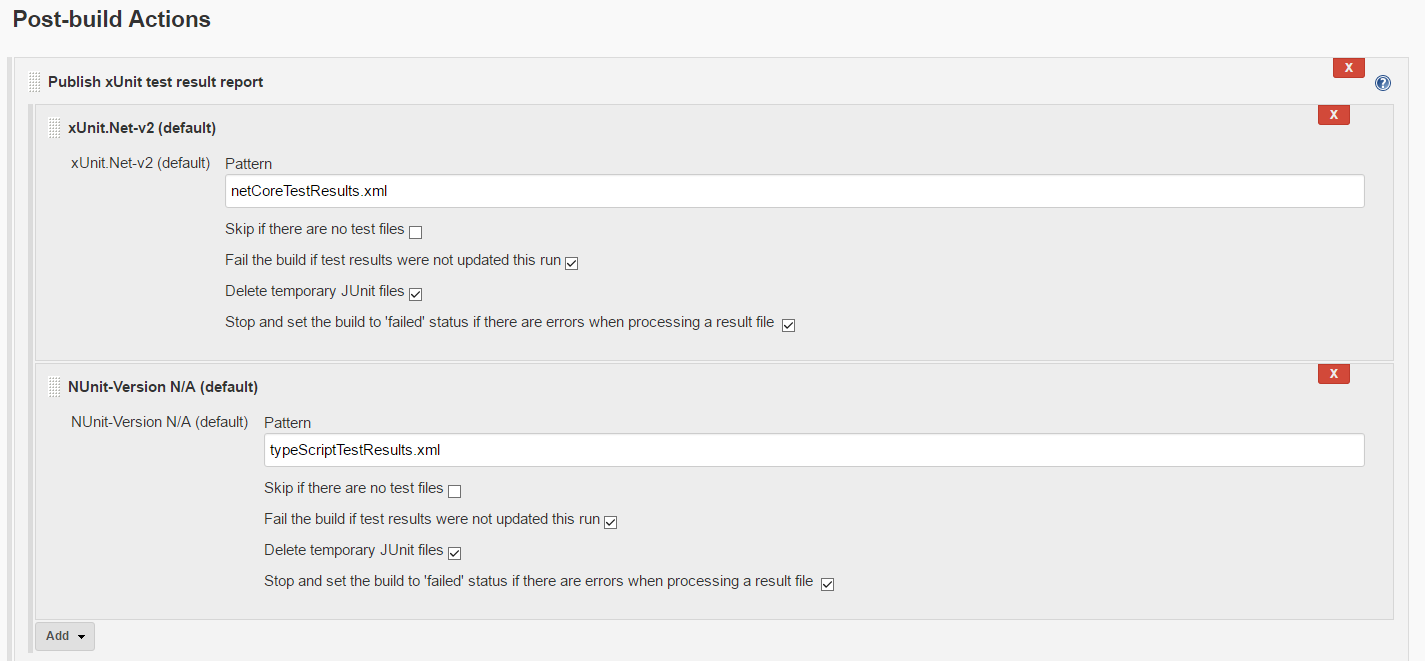
Now that the tests are being executed and saved to two xml files, you'll need the following two post build actions:

After that, your tests should be reported in Jenkins!
Update 22.09.2016: Updated Angular 2 to 2.0.0 Final and Asp.Net Core to 1.0.1
Update 23.11.2016: Updated Asp.Net Core to 1.1.0
Update 21.02.2017: The demo project is now using webpack as module loader, see here (and on GitHub) how to upgrade
Update 28.05.2017: Updated Angular to 4.1.3 and Asp.Net Core to 1.1.2. Switched to Visual Studio 2017 csproj format
Update 03.02.2018: Updated Angular to 5.2.3 and Asp.Net Core to 2.0
 by
by